
Something Constructive
Hello my friends. I would like to apologize for going postless (better than postal!) for so long. In the past month, I have completed a major project (keep reading for details), experienced a death in my extended family, and kept a promise to visit my friend Ray (remember Katy?), which was delayed for several months. Finally, at long last, I am back with a new post! I am happy to present to you, hopefully for your viewing pleasure :), a selection of the many pictures that I took to document the largest construction project that my two hands have ever built. So, please sit back, relax, and enjoy the show! (Disclaimer: An occasional mouse activation will be required for maximum enjoyment.)
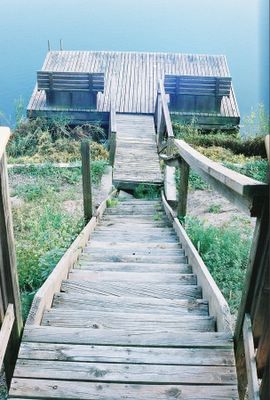
To begin the program, here are two photos of the way things looked before I began the work. Well, to be honest, the handrails on the stair were falling off, so I removed all of them and then temporarily reattached the ones on the right. Please take note of the yawning chasm at the base of the stair, and the artfully curved and rotated lower half of the stair. The hill is mostly fine sand, which had shifted quite a bit over time, and literally moved and deformed the stair as it shifted! Note also the prime botanical specimens which once called this stair "home sweet home". Not shown, are the multiple three foot tall yucca plants (I will show you one of these monsters in a later photo) that had grown into the stair, which I had already laboriously dug out. They are really nasty plants, and damn near impossible to kill! They kept growing new shoots from their tangled web of tuberous roots. I finally put them down (dead, dead, DEAD!) with some RoundUp herbicide. Normally, I hate using chemical poisons, but this stuff is sprayed on the leaves of the plant and it kills the roots.
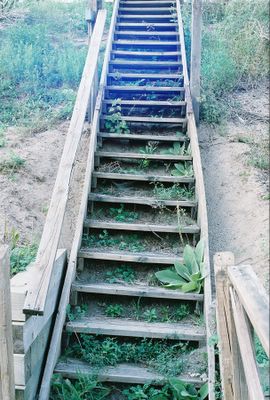
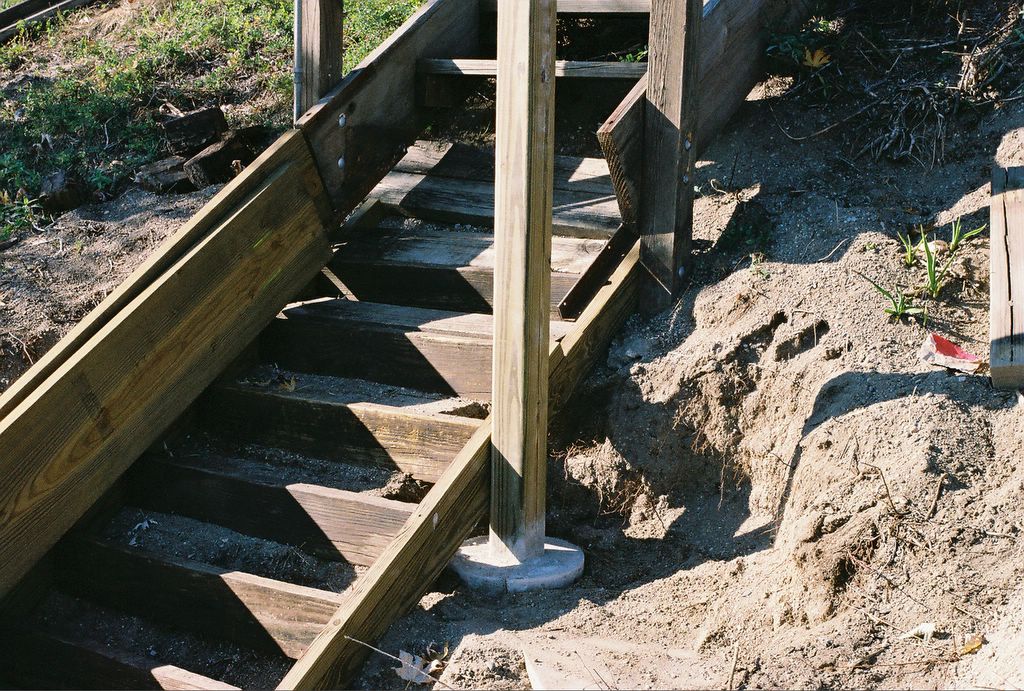
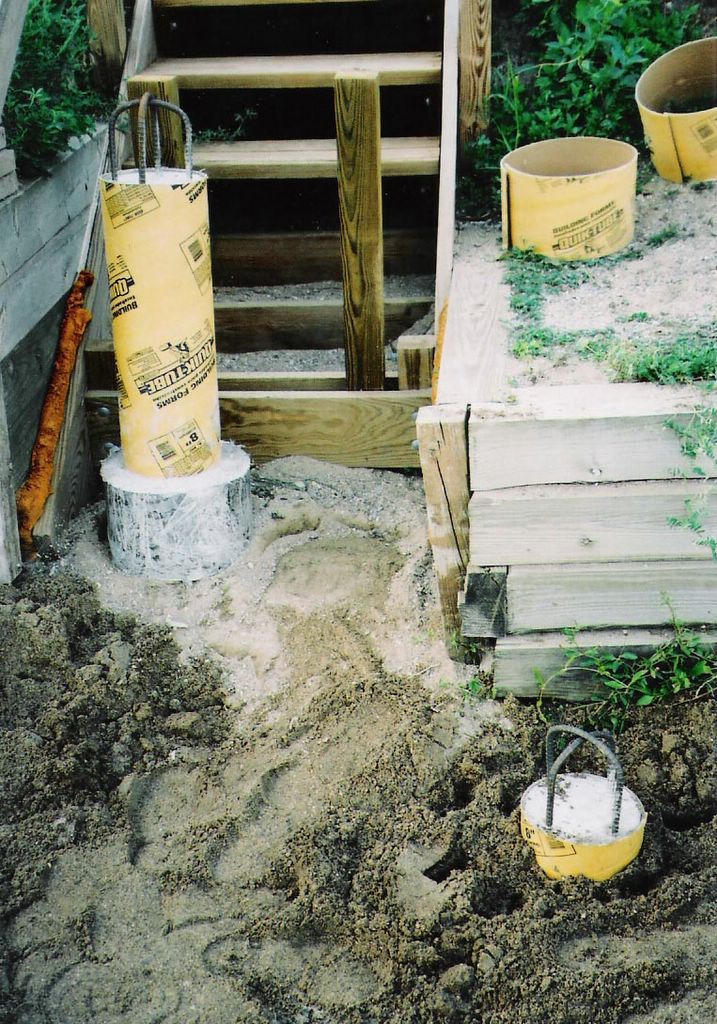
Ok, now for some improvements. After a lot of thought about what could be done to remediate the problem of future sand shifting, I decided that the best solution was to construct a substructure in the form of a terrace to contain the sand under the lower half of the new stair. I have a picture of the giant hole that I had to dig (with my trusty rusty spades) in the hillside, but sadly it didn't make the final cut (hey, I have about 45 pics in all, and it was quite a job to load these 15!). So, in this photo, I have installed the wooden terrace structure, which I assembled elsewhere and wheeled down the hill and into place. Also, shown is one of eight new posts to which the new stair and handrails will be attached. Each post is supported by an 8"x8" concrete block set at the bottom of a three foot deep hole. The posts are held in position laterally (as you can see) by a bag's worth of post setting concrete which I poured into an improvised form.

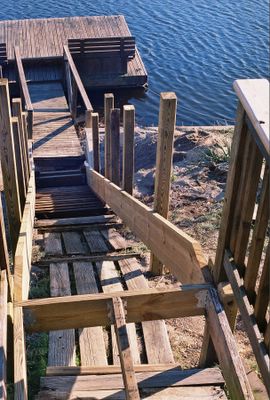
Here, the project is a bit further along. I have installed all the posts and the new stair stringers (beams). The wood on the ground are old stair treads which I placed temporarily to give me something to walk on. Trying to walk up and down a steep hill of loose sand is a skill that I have yet to master (digging holes in that damn sand wasn't much fun either)!
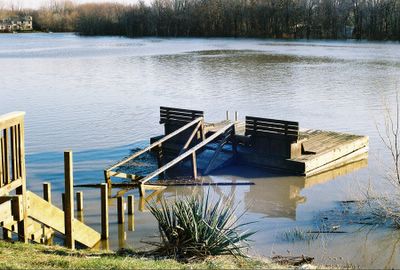
Well, here we have a perfect example of why stairs and dock ramps on the shore of this lake are mostly shot to hell (possible future projects for me!). This lake lies right next to the main river that flows through Indianapolis. Sometimes, the river rises high enough several times a year to flood the lake. When a flood happens, the very antiquated and unhygienic combined storm drain and sewer system of Indianapolis dumps tons of raw sewage into the river, some of which ends up in this lake! Nasty!! The water really rises high. I would estimate that the water is something like 12 feet higher in this photo compared with the previous one! See that big green bushy thing to the right of the stair? That is a yucca. Even floods will not kill those things!
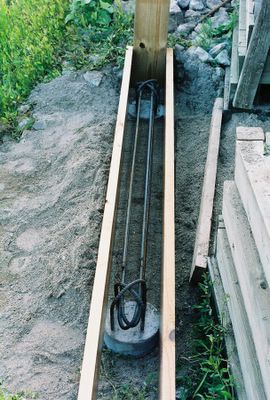
Ok, at this point, the flood has receded and I am back to work. I have removed the old dock ramp and hauled the partially rotten debris to the city landfill. What I am doing here is sinking reinforced concrete footings near the lake to support the weight of the new ramp and also to anchor it in place against future floods. Wood that is submerged has a great deal of bouyancy (tendency to float). I precast these footings elsewhere and moved them into place with my wheeled dolly. They weighed about 200 pounds each and were nearly beyond my ability to lift, but I managed, and thankfully did not herniate myself! I have not shown the pictures of digging these holes. That was quite a pain! The holes were nearly three feet deep, but about one foot below the surface was the level of the lake. Thus, digging down one foot resulted in a hole full of water! I used a large round plastic cylinder (former water softener tank) to keep the hole from collapsing as I dug below the water. That water still stank from the flood too!

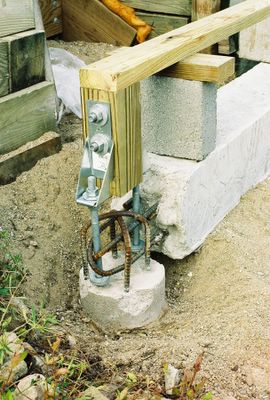
Here, both footings are in place and I have set a form of scrap wood to cast a reinforced concrete beam between the footings to give the foundation extra weight and stability.
Here, the concrete beam has been cast and I have set a temporary jig to hold the anchor bolts in position at each end for the next concrete placement.
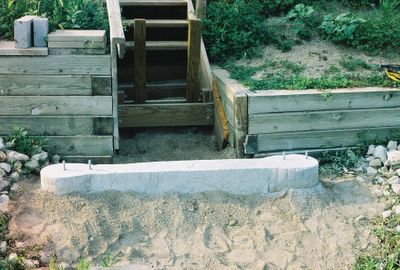
Behold the finished foundation. Doesn't she look solid? Like a rock! :)
Here, I have skipped ahead a bit. I constructed a wood frame for the new ramp, had some really solid hinge pieces fabricated at a local steel shop, and then, I had to put everything together. Getting this ramp frame in place was definitely not a one man show! I have several cousins in the Indianapolis area who make me look small, and I am no 98 pound weakling. One of them owed me a big favor for helping him move (twice!). So, with our combined hefting ability, some help from my sturdy wheeled dolly and the hill itself, we got that sucker into place and all hinged together in a single afternoon. It was definitely "Miller Time" (cheap American beer) after that, but seeing as neither of us are big beer drinkers, we toasted our success with more Gatorade (it was a hot day!).
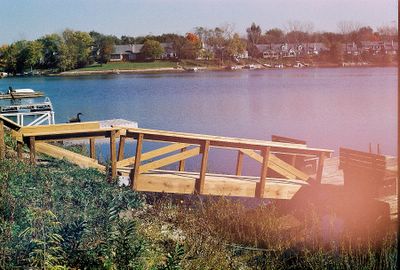
Moving along, I have started to attach the deck boards to the ramp frame. Also, you can see the completed frame of the platform to which the ramp is connected.
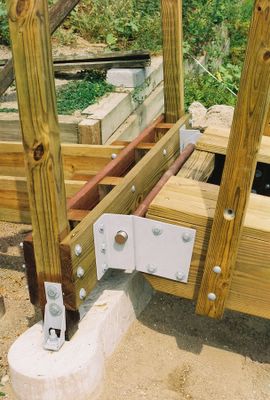
Here is a detail shot of one of the ramp hinges. Those steel plates are 1/4 inch thick and the hinge pin is a 1.5 inch diameter solid steel bar. I had originally planned to use steel pipes, but the steel fabricator screwed up and made the hinge plate holes too big, so they threw in the solid bars at no charge. The ends of the bars were later secured with large steel rings to keep the pin in place during many years of anticipated flooding.
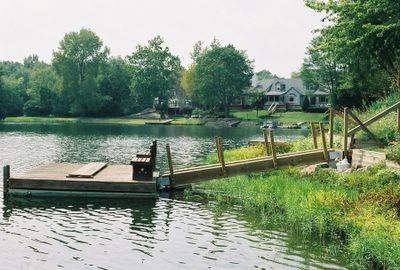
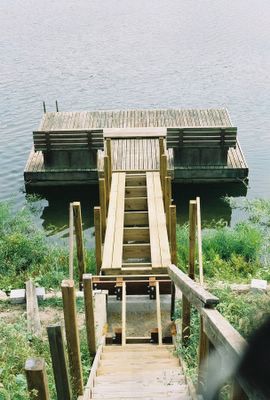
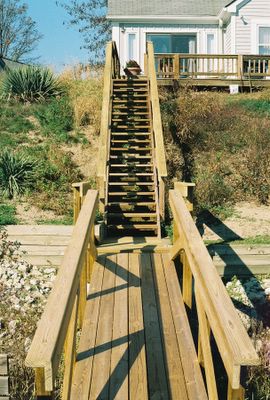
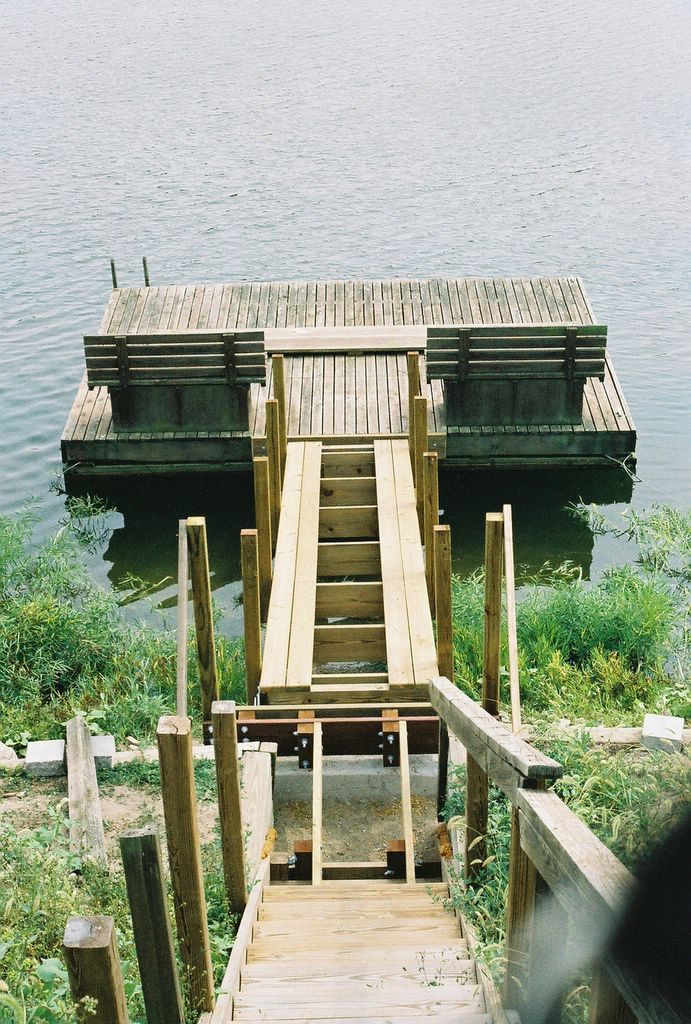
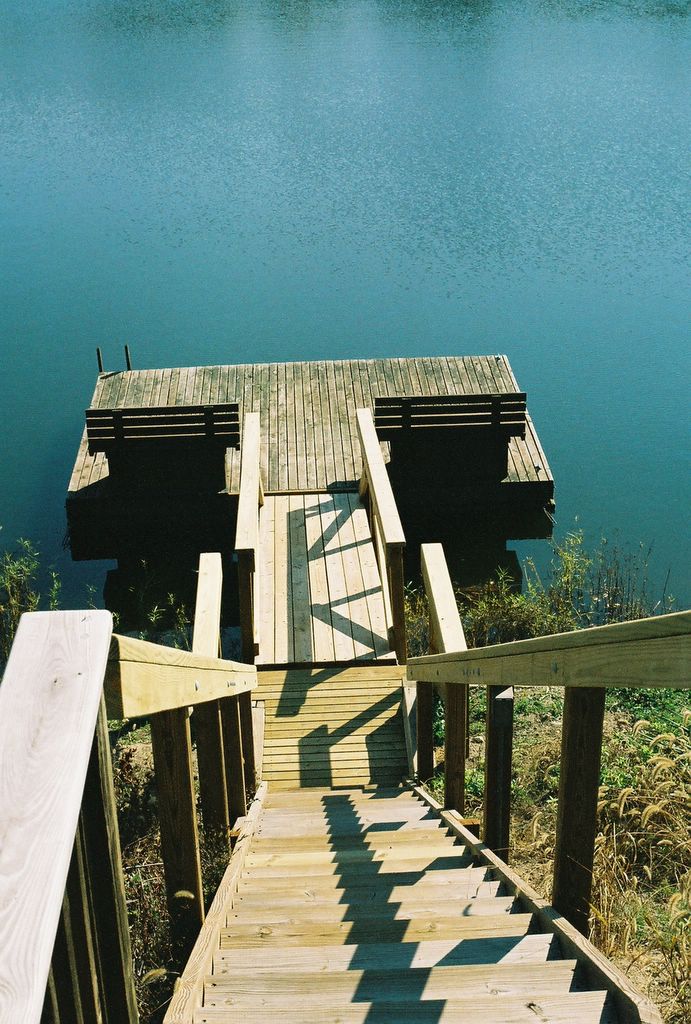
The next three pictures are "money" shots of the completed project (yes, I did bill for my services, actually there were several bills for this job!). This work is solid! Well, what can I say, I am an engineer, after all. :) Oh, one more thing, I did a bit of repair and reinforcement work on the dock, but it was basically in good shape. In the spring, it will be cleaned and sealed with the same wood preservative that I applied to all the new wood. The wood is treated to resist rot (at the factory), but the sun will damage its surface unless it is stained or sealed. Thanks for checking out my handiwork!

To begin the program, here are two photos of the way things looked before I began the work. Well, to be honest, the handrails on the stair were falling off, so I removed all of them and then temporarily reattached the ones on the right. Please take note of the yawning chasm at the base of the stair, and the artfully curved and rotated lower half of the stair. The hill is mostly fine sand, which had shifted quite a bit over time, and literally moved and deformed the stair as it shifted! Note also the prime botanical specimens which once called this stair "home sweet home". Not shown, are the multiple three foot tall yucca plants (I will show you one of these monsters in a later photo) that had grown into the stair, which I had already laboriously dug out. They are really nasty plants, and damn near impossible to kill! They kept growing new shoots from their tangled web of tuberous roots. I finally put them down (dead, dead, DEAD!) with some RoundUp herbicide. Normally, I hate using chemical poisons, but this stuff is sprayed on the leaves of the plant and it kills the roots.


Ok, now for some improvements. After a lot of thought about what could be done to remediate the problem of future sand shifting, I decided that the best solution was to construct a substructure in the form of a terrace to contain the sand under the lower half of the new stair. I have a picture of the giant hole that I had to dig (with my trusty rusty spades) in the hillside, but sadly it didn't make the final cut (hey, I have about 45 pics in all, and it was quite a job to load these 15!). So, in this photo, I have installed the wooden terrace structure, which I assembled elsewhere and wheeled down the hill and into place. Also, shown is one of eight new posts to which the new stair and handrails will be attached. Each post is supported by an 8"x8" concrete block set at the bottom of a three foot deep hole. The posts are held in position laterally (as you can see) by a bag's worth of post setting concrete which I poured into an improvised form.
Here, the project is a bit further along. I have installed all the posts and the new stair stringers (beams). The wood on the ground are old stair treads which I placed temporarily to give me something to walk on. Trying to walk up and down a steep hill of loose sand is a skill that I have yet to master (digging holes in that damn sand wasn't much fun either)!

Well, here we have a perfect example of why stairs and dock ramps on the shore of this lake are mostly shot to hell (possible future projects for me!). This lake lies right next to the main river that flows through Indianapolis. Sometimes, the river rises high enough several times a year to flood the lake. When a flood happens, the very antiquated and unhygienic combined storm drain and sewer system of Indianapolis dumps tons of raw sewage into the river, some of which ends up in this lake! Nasty!! The water really rises high. I would estimate that the water is something like 12 feet higher in this photo compared with the previous one! See that big green bushy thing to the right of the stair? That is a yucca. Even floods will not kill those things!

Ok, at this point, the flood has receded and I am back to work. I have removed the old dock ramp and hauled the partially rotten debris to the city landfill. What I am doing here is sinking reinforced concrete footings near the lake to support the weight of the new ramp and also to anchor it in place against future floods. Wood that is submerged has a great deal of bouyancy (tendency to float). I precast these footings elsewhere and moved them into place with my wheeled dolly. They weighed about 200 pounds each and were nearly beyond my ability to lift, but I managed, and thankfully did not herniate myself! I have not shown the pictures of digging these holes. That was quite a pain! The holes were nearly three feet deep, but about one foot below the surface was the level of the lake. Thus, digging down one foot resulted in a hole full of water! I used a large round plastic cylinder (former water softener tank) to keep the hole from collapsing as I dug below the water. That water still stank from the flood too!
Here, both footings are in place and I have set a form of scrap wood to cast a reinforced concrete beam between the footings to give the foundation extra weight and stability.

Here, the concrete beam has been cast and I have set a temporary jig to hold the anchor bolts in position at each end for the next concrete placement.

Behold the finished foundation. Doesn't she look solid? Like a rock! :)

Here, I have skipped ahead a bit. I constructed a wood frame for the new ramp, had some really solid hinge pieces fabricated at a local steel shop, and then, I had to put everything together. Getting this ramp frame in place was definitely not a one man show! I have several cousins in the Indianapolis area who make me look small, and I am no 98 pound weakling. One of them owed me a big favor for helping him move (twice!). So, with our combined hefting ability, some help from my sturdy wheeled dolly and the hill itself, we got that sucker into place and all hinged together in a single afternoon. It was definitely "Miller Time" (cheap American beer) after that, but seeing as neither of us are big beer drinkers, we toasted our success with more Gatorade (it was a hot day!).

Moving along, I have started to attach the deck boards to the ramp frame. Also, you can see the completed frame of the platform to which the ramp is connected.
Here is a detail shot of one of the ramp hinges. Those steel plates are 1/4 inch thick and the hinge pin is a 1.5 inch diameter solid steel bar. I had originally planned to use steel pipes, but the steel fabricator screwed up and made the hinge plate holes too big, so they threw in the solid bars at no charge. The ends of the bars were later secured with large steel rings to keep the pin in place during many years of anticipated flooding.

The next three pictures are "money" shots of the completed project (yes, I did bill for my services, actually there were several bills for this job!). This work is solid! Well, what can I say, I am an engineer, after all. :) Oh, one more thing, I did a bit of repair and reinforcement work on the dock, but it was basically in good shape. In the spring, it will be cleaned and sealed with the same wood preservative that I applied to all the new wood. The wood is treated to resist rot (at the factory), but the sun will damage its surface unless it is stained or sealed. Thanks for checking out my handiwork!


posted by David | 12/08/2005 12:21:00 AM
|
30 comments
![]()